Tutorial | Quick and Easy Summer Makeup
My makeup tends to go a bit more subtler during Summer, especially when I am on holiday to somewhere exotic. A load of people forget that the sun is usually out in the Summer and it's a little bit warmer and the more makeup you have, the more makeup melts off into a big mess. I usually don't wear a Foundation anyway but this is something you can add if you usually wear it. The look is very easy, simple and wearable and the main products I use are very affordable and you can easily find them.
I begin by applying my Simple Day Cream with SPF15. I put this one when I first wake up. Throughout the day if my skin gets a little dry I dot the Simple Light Moisturiser to restore the moisture in my skin. Next I apply some lip balm just to soften and rehydrate my lips before makeup application to allow it to sink in so if doesn't affect the colour of my lipstick.
I usually don't wear foundation anyway, but I still like to apply a primer so my concealer and blusher/bronzer stay on. This primer is one by NYC and it has a luminescence hint to it.
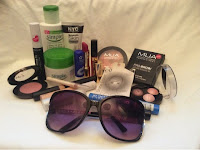
The face products that I tend to use are the ELF Shine Eraser sheets to reduce shine, Natural Collection Colour Correcter in Green to neutralise redness, MUA Mosaic Bronzer to add a warm glow to my face, No7 Blusher in Soft Damson to add a small tint of colour to my cheeks, MUA Cover and Conceal in Natural to conceal the green corrector and other imperfections and finally the ELF radiance enhancer in Golden to highlight the Cupid's bow,
After applying my primer I am applying some of the colour corrector to the redness around my nose and I blend this in with my ring finger,
Having done that, I dot a tiny amount of liquid concealer to cover up the green and the green helps the concealer cover up the imperfections better.
I use a dense brush to blend in some bronzer to the side of my face to add some warmth and definition. Then I use a slightly bigger brush to sweep some blusher to my cheeks and I'm making sure I blend the two together using a fan brush.
The eye makeup products I use are the MUA Brow Perfection Kit, Beauty UK primer, MUA Baked Eyeshadow Trio in Pink Sorbet, MUA Clear Mascara and Barry M Eyeliner Pencil in White.
The next step is to groom and define your brows. I used a spoolie to groom them. My eyebrow kit for this look is the MUA Brow Perfection and I use an angled brush to feather the darker brown powder to my brows. I seal them into please using the MUA clear Mascara.
Blend your eyelid primer to your eyes and wait for it to dry. The next step is to colour in your eyelid using a white eyeliner and blending it out to create a smooth base for eyeshadow and to make it a bit more vibrant. Confession time: When I applied this makeup using the white base, I went to sleep with it still on. When I woke up this morning the pink on the lid was still in place and still very pigmented so using a white eyeliner is something worth doing because it holds onto the makeup for longer, even with an eye primer.
I am using the mid-toned pink shade from the MUA Baked Eyeshadow Trio all over my lid to cover the white eyeliner.
Take a dense blending brush and gently buff the darker pink to the outer corner and blend it further into the crease. Dot a little lighter pink into the inner corner to brighten the eye.
The final eye step is to of course, curl your lashes and apply some waterproof mascara.
I love the Elizabeth Arden lip products so I am using the Ultra Ceramide Lipstick in Tulip which is one of my favourite lipsticks and I am combining it with the Beautiful Colour lip gloss in Passion fruit.
Bright lips are a statement look for Summer so I am opting for a bold pink lipstick and layering with a lip gloss in the same colour.
So I hope you guys enjoyed this makeup tutorial and make sure you come back next week for a new blog post!
SparkleEyes x


Comments
Post a Comment