Posts

Showing posts from March, 2013

Tutorial | Leopard Print Makeup

Image
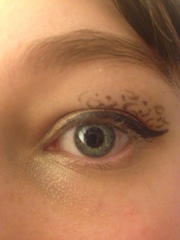
Hey guys Today I wanted to do a leopard print eyes look because for those of you that know me, I am obsessed with leopard print, but surprisingly I haven't actually done a leopard print look before so I decided I was going to. If you do not want to add the spots, it becomes a really wearable look because it's just a natural eye. Anyway, this is the tutorial. The palette I'm using is the MUA 12 Shade Heaven and Earth Palette, £4. First, prime your eyes as always. My primer is the MUA Pro-Base primer Step One Use the beige shade to cover the entire lid. Then use a darker brown on the outer corner of your eye and blend together so you get a really nice natural gradient. Step Two Take your liquid liner (MUA Liquid Eyeliner, £1) and create a thick sixties flick wing as shown above. You can make this line as thin or as thick as you want but I personally think it's better with the thicker line. Step Three Use a liquid eyeliner pen (MUA extreme felt ti

Haul | Superdrug March 2013

Image
Hey guys Earlier today I went shopping and spent quite a bit of money on new makeup and started to get some new Spring clothes but anyway I spent the majority of my money in Superdrug and I did spend more in Primark but the other things I bought were essential but personal stuff, but anyway, these are the things I bought plus a mini review so enjoy :) This product I have been deciding against for a while but I finally decided to get it. This is the Professional Pro-Brow Ultimate Eyebrow Kit (£3.50). The reason I kept changing my mind about this is that I didn't really bother with spending a lot of money over my brows, I just combed them and that always seemed enough, so I decided to try this out. My first reaction is that the packaging is so thin its easy to carry round in your bag and it has a larger mirror so it's easy to see what you're doing. It also has three different shades of brow powder so it suits all hair colours. You just need to use the angled brush to

Celebrity Inspired: Marina and the Diamonds Eye Tutorial

Image
Hey guys It has been much requested by a friend at school to do this look inspired by Marina and the Diamonds... actually, when I say 'requested' I mean if I didn't post it I would be hunted down... So I have no option but do do an inspired look from Marina and the Diamonds. This look is very simple to wear and do and it is pretty easy to do without a tutorial, but so I don't get hunted down, this is it... As always, the first thing you need to do is prime your eyes so the liner doesn't budge. Then dab a little bit of primer just above your cheekbone because this is where we will be doing the heart.  Take your liquid liner and draw the Sixties Flick, but the wing has to be quite small but about a quarter of a centimeter thick. About 2 cm underneath your right eye, you can use the same liner or use an eyeliner pen to create an outline of a small heart. Then fill this in black.  Just to add my personal touch to this, and to make it look less like copying,

Celebrity Inspired: Jennifer Lawrence Eye Tutorial

Image
Hey guys Today I wanted to do the latest of my celebrity series and I chose to do Jennifer Lawrence because her smokey eye is incredibly simple and wearable. I know this isn't my best tutorial, it was rushed, but the next one will be a lot better, that's a promise. For this look, you will need either sellotape or a post-it note (just something that sticks). I'm using my Claire's Smokey Eye Palette to do this. Or you can use black, light grey/white and a mid grey. Prime your eyelids and also prime just underneath your eyes as well, because we are having some colour there. Stick the tape or whatever you have diagonally on your lids so it joins your lower lash line and you can have a straight edged wing. Blend a small amount of the lightest right in the centre of the eyelid to brighten your eyes. Take an angled brush and draw the Sixtes - Flick, usinf the tape as a guideline. Blend out the black, pulling it into the crease. When you remove the tape you'll h

Behind the Blog

Hey guys Today I wanted to go a little bit further and tell you all what happens behind the blog - everything from where I made my logo to how I decide what and when to publish and stuff like that. My blog isn't very technical, as you can see, but there is quite a bit that goes on here so I want to tell you how I do that and I hope it encourages you to start a blog if you're allowed so I hope you like this :) Logo As you know, from the start I had a typed logo from Blogger templates. A few weeks ago in IT, we had to generate a logo for our work and it gave me an idea to make my own logo for my blog. Anyway, you can make your own logo at www.cooltext.com . The first logo I made here was just temporary then I created the logo that is on my blog right now. I literally spent a while typing in single letters at the time and choosing which fonts look good. I did plan this out first and went to the website and did some experimental logos and decided which letters needed changi

Favourite New...?

Hey everyone So this morning I tried a new lipstick colour from MUA which is my favourite lip colour now and I tweeted that this morning so it gave me an idea to randomly tweet my favourite products because some of them have changed since I did the post on my favourite products. So, if you want to know what I'm loving then follow me on Twitter @SparkleEyes101 I will see you guys tomorrow for the next celebrity tutorial, I won't be able to publish on Saturday because I shall be partying so I'll post tomorrow SparkleEyes x

Celebrity Inspired: Kim Kardashian Eye Tutorial

Image
Hey guys Today I wanted to do my first Celebrity Inspired Makeup and I chose Kim Kardashian because even though I'm not a massive fan of her, I still love her makeup and it always looks flawless so I wanted to do an inspiration of this. I'm not sure on other celebrity makeup so please tweet me or comment if you have any ideas or requests.  Anyway, for this look you need different brushes - an actual eye shadow brush, blending brush, angled brush and a flat eye shadow brush. The palette I'm using is my 17 Smokey Eye Palette, if you don't have anything similar you basically need a purple, black and a grey eye shadow colour.  PRIME YOUR EYES as always. You can probably guess I have the MUA Eyelid Primer. Then take an eye shadow brush and apply your lilac shade all over the lid, but make sure it doesn't go in the crease. Use the darker grey shade mixed with a lighter grey and use the flat eye shadow brush to pat this on the outer third of your lid,

Weather Inspired: Cloud Crease Tutorial

Hey guys First off, sorry this is a few days late - I have a shedule thing that I am trying to follow that but I did get sick so I came home from school and slept from 11 in the morning to about 1 in the afternoon and couldn't be bothered to upload this tutorial but I am feeling better now so it's back to normal. This is basically a smokey eye but in your crease. It is important to keep your eyelid clean in this look. I am using my Claire's Smokey Eye Palette but you need a mid-dark grey and a black eyeshadow colour with an angled and blending brush. This was inspired by typical british weather, even though its nearly Spring the weather is crap and grey skies, rain, wind... Anyway, I hope you like this look. 1) As always, prime your eyes, but you only need to prime the crease. Then take the angled brush and and the grey eyeshadow and trace the outer third of the crease. Blend it towards the centre so you get a tonal effect (the darkest part should be the outer-most p

Weather Inspired: Rainbow Eyes Tutorial

Image
Hey everyone Recently I had a poll on my blog about which tutorial series you want me to do next and 50% of votes were celebrity and 50% were for weather but since the Weather one was voted for first I'll be doing that, then the celebrity inspired one will follow after the three weather inspired looks I'm doing. So today this tutorial I have seen loads of times on YouTube, Google and other blogs and I wanted to give it a try so I was quite pleased you guys voted for this first. If you haven't already guessed by the title, today's tutorial is 'Rainbow Eyes'. This look can be dressed up or down, you can simply wear the plain rainbow or you can add your own signature look to it by adding leopard print, zebra stripes, rhinestones, glitter - whatever you want really! I did some research on this - I typed rainbow eyes into Google and got hundreds of gorgeous designs so this is my version, I think it is quite wearable. Anyways, I hope you guys enjoy this tutorial.