School Photo Day Makeup Tutorial
Photo day is coming up very soon and I thought now would be the perfect time to do a makeup tutorial for photo day that works for flash portrait photography.


There are a few things to consider when doing your makeup for your school photo.
1) You don't want anything that is shimmery, glittery or too dark. Matte makeup is best because it won't reflect the flash from the camera and the reflection from the flash will make you look washed out.
2) You don't want to experiment with any new makeup looks, or new products, just in case they don't work out and you are stuck with that photo forever.
3) You don't want over the top makeup or anything you don't like because you'll hate it when you look back on it in five or so years time.


SparkleEyes x

There are a few things to consider when doing your makeup for your school photo.
1) You don't want anything that is shimmery, glittery or too dark. Matte makeup is best because it won't reflect the flash from the camera and the reflection from the flash will make you look washed out.
2) You don't want to experiment with any new makeup looks, or new products, just in case they don't work out and you are stuck with that photo forever.
3) You don't want over the top makeup or anything you don't like because you'll hate it when you look back on it in five or so years time.
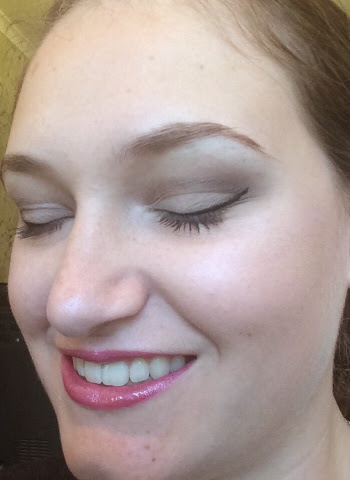
Beginning with face makeup, I am using ELF Personal Blend Foundation and mixing the shades 'Light' and 'Fair' together in the lid and applying this like a foundation with a foundation brush and then using a complexion brush to blend this all over my face. You want your foundation shade to be as accurate as possible, but foundation isn't essential in a school photo. It is a school photo, after all. I go for foundation in a school picture just so I have some confidence in what my skin looks like and to make sure there is no excess oil that reflects the light.

Next I am taking my MUA Cover and Conceal Concealer in the shade Natural and covering any problematic areas such as dark circles and blemishes. I dot the concealer on the back of my hand and then use ELF Flawless Concealer brush to buff into the skin in circular motions. If there are any red areas I am taking Natural Collection Green Colour Correcting Concealer and applying it on redness before concealer. This will make them less visible.

To set the concealer, I am taking Natural Collection Translucent Powder and dusting this all over the concealer and in the T Zone to keep oil under control. If your skin is dry or you don't use powder, skip this, but my concealer isn't matte so bear that in mind.

For some colour on my cheeks and definition to my face, I am taking my ELF Bronzer in Glow and using a complexion brush to dust onto my jawline and blending it up towards my temples and hairline. I am also using this on the sides of my nose to make it look thinner and under my chin to create the illusion of shadows. I am literally using the tiniest amount of bronzer. For blush, I am taking my No.7 Blush in Soft Damson on the apples of my cheeks.


I usually highlight areas of my face for school photos. Using ELF Radiance Enhancer in Spotlight, I am applying this on the top of my cheekbones, tip of my nose and on the cupids bow of the upper lip.

The first thing for my eyes is to groom and define my brows and I am using MUA Pro Brow Kit and setting them with ELF Lash and Brow Duo.

Prime your eyelids and I am also applying a white eyeliner base.

For my eyes I am using MUA Matte Palette and this is good because it has natural tones that complement all skin tones. The first colour I am using is the light taupe all over my lid.


In the inner half of the lid I am using a pale pink to brighten the eyes.

In my crease, I am taking my eye crease brush and the dark brown and tracing the outer half of the crease quite thickly. Then using a fluffy brush, buff this out into a soft line. This will contour the eyes creating a little extra definition.

I am taking the lightest colour on the inner and outer corners of my eyes and underneath the brow bone.

I can't not wear eyeliner so I am using ELF Cream Eyeliner in black and drawing a cat wing. I begin by using an angled eyeliner brush to draw the line from the outer corner, then a precise eyeliner brush to finish the rest of the line. I am only drawing a very thin line on my upper lash line. Then curl your lashes and apply a generous coating of mascara.

To make sure that there are no gaps in my upper lash line, I am taking a black kohl eyeliner and running this on my upper water line. This makes my lashes look a lot fuller and fills in any gaps between my lashes.


For my lips, I am keeping them matte but also making them a bit bolder so I am using Elizabeth Arden Ultra Ceramide Lipstick in Tulip with a tiny amount of Tanya Burr Lip Gloss in Smile, Dream, Sparkle on the centre of the lower lip.

So I decided to create a 'Photo Day Survival Kit' to make sure there are no flaws to ruin your photo.
The first essential thing is a compact mirror. Use this to not only apply makeup but to check your makeup before your photo. There's nothing worse than thinking your photo turned out well but when you get your photo back, there is smudged makeup or food in your teeth.

The next thing is actually eye makeup wipes to fix smudged eye makeup.

I like to take my ELF Shine Eraser Sheets to remove the oil from my skin.

Finally I have the makeup and tools I used to apply my makeup.
So I hope you guys enjoyed this tutorial and I hope your photo day goes well.


What are your photo day makeup tips?


Comments
Post a Comment